
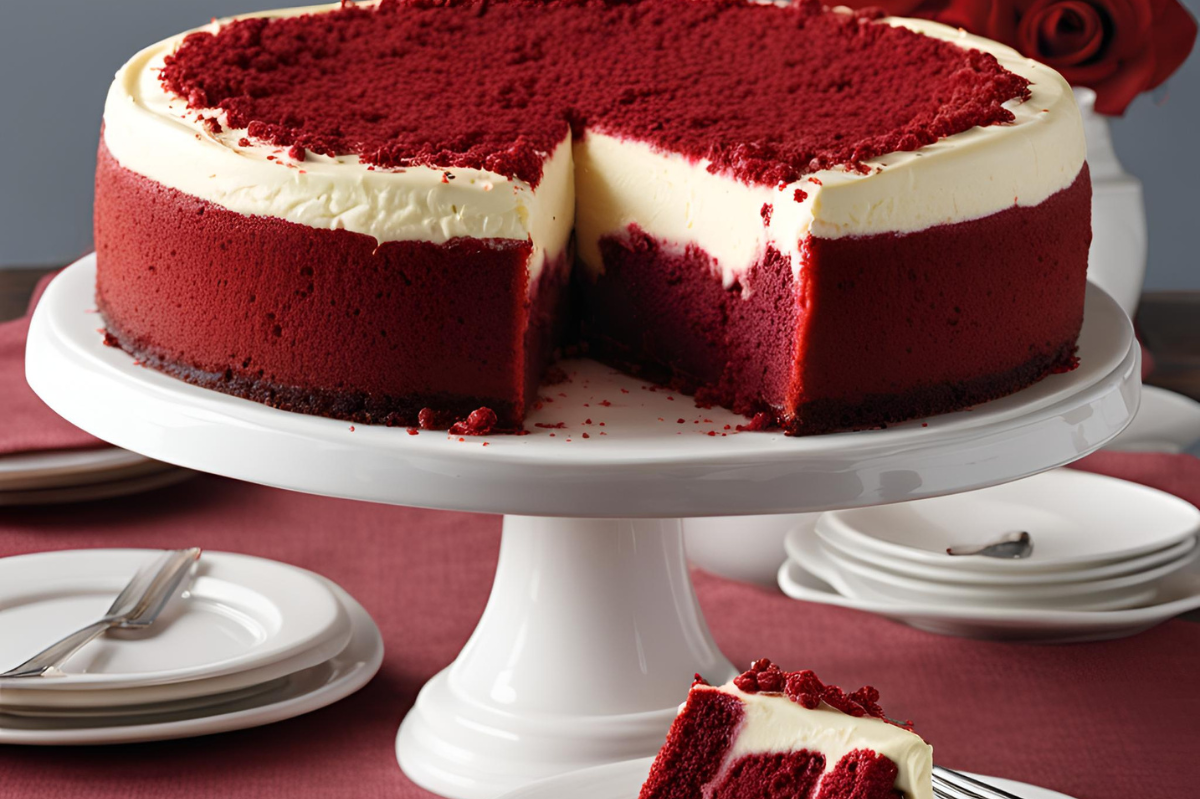
Red Velvet Oreo Cheesecake is an irresistible combination of rich flavors and creamy textures. This unique dessert brings together the best of red velvet cake and Oreo cheesecake, creating a treat that’s perfect for any occasion.
Ingredients
To create this mouthwatering dessert, you’ll need the following ingredients:
- Red Velvet Cake Mix
- Oreo Cookies
- Cream Cheese
- Sugar
- Eggs
- Vanilla Extract
- Butter
- Heavy Cream
- Cocoa Powder
- Red Food Coloring
For more detailed ingredient lists and other unique recipes, check out the recipes page.
Equipment Needed
Ensure you have these tools on hand before starting:
- Mixing Bowls
- Electric Mixer
- Springform Pan
- Spatula
- Baking Sheet
Preparation Steps
- Preheat your oven to 325°F (163°C).
- Prepare the springform pan with non-stick spray.
- Crush the Oreos for the crust.
Making the Oreo Crust
- Crush the Oreos finely.
- Mix the crushed Oreos with melted butter.
- Press the mixture into the bottom of the springform pan.
- Bake for 10 minutes.
For more tips on perfect baking techniques, you can visit the home page.
Preparing the Red Velvet Layer
- Mix the red velvet cake ingredients.
- Pour the batter over the baked Oreo crust.
- Bake until set, about 20 minutes.
Creating the Cheesecake Layer
- Beat cream cheese and sugar until smooth.
- Add eggs one at a time, beating after each addition.
- Mix in vanilla extract.
- Pour the mixture over the baked red velvet layer.
- Bake for 45-50 minutes until the cheesecake is set.
For more tips on achieving the perfect cheesecake texture, check out Perfect Cheesecake Tips.
Cooling and Setting
- Cool the cheesecake on a wire rack for 1 hour.
- Refrigerate for at least 4 hours or overnight.
If you’re interested in more creative dessert ideas, visit Creative Red Velvet Desserts.
Decorating and Serving
- Add a whipped cream topping.
- Garnish with crushed Oreos and red velvet crumbs.
- Here are some tips for cutting and serving:
- Use a sharp knife dipped in hot water for clean slices.
- Wipe the knife after each cut.
Conclusion
This Red Velvet Oreo Cheesecake is a delightful dessert that combines the best elements of two classic treats. Try this recipe for your next special occasion and impress your guests with a dessert that’s both beautiful and delicious.
Equipment Needed
Baking is both an art and a science, and having the right tools can make all the difference in your culinary creations. Whether you’re a novice baker or a seasoned pro, having the essential equipment at your disposal is crucial for success. Here are five must-have tools every baker needs in their kitchen arsenal:
1. Mixing Bowls
No baking endeavor is complete without a reliable set of mixing bowls. These versatile vessels come in various sizes, allowing you to whisk, beat, and combine ingredients with ease. Look for bowls made of durable materials like stainless steel or glass, which are easy to clean and won’t retain odors or flavors.
2. Electric Mixer
While mixing by hand can be therapeutic, an electric mixer is a game-changer when it comes to efficiency and consistency. Whether you’re whipping up fluffy meringues or creamy cake batters, an electric mixer can help you achieve the perfect texture every time. Invest in a quality mixer with multiple speed settings and interchangeable attachments for maximum versatility.
3. Springform Pan
For baked goods that require a flawless presentation, a springform pan is a must-have tool. These ingenious pans feature a removable bottom and sides that unlatch, allowing you to release delicate cakes and tarts without damaging their shape. Whether you’re making a decadent cheesecake or a delicate fruit tart, a springform pan ensures your creations come out looking picture-perfect.
4. Spatula
A good spatula is a baker’s best friend. From scraping down the sides of mixing bowls to gently folding in ingredients, a high-quality spatula is essential for precision and control in the kitchen. Look for a spatula with a heat-resistant silicone head and a sturdy handle for comfortable gripping.
5. Baking Sheet
Whether you’re baking cookies, roasting vegetables, or toasting nuts, a reliable baking sheet is indispensable. Look for a heavy-duty sheet with a nonstick surface for easy release and cleanup. Opt for a rimmed baking sheet to prevent spills and ensure even baking throughout.
Conclusion
With the right equipment at your disposal, you can elevate your baking game and create culinary masterpieces with confidence. Invest in high-quality tools that are built to last, and you’ll be well on your way to becoming a baking virtuoso. Happy baking!
Preparation Steps
Before diving into the delightful world of baking, it’s essential to prepare your workspace and ingredients. Here are the crucial steps to ensure your Oreo cheesecake turns out flawlessly:
- Preheat Oven: Begin by preheating your oven to 325°F (163°C). This step ensures that your cheesecake bakes evenly to perfection, with a golden crust and a creamy center.
- Prepare Springform Pan: Grease your springform pan generously with non-stick spray. This prevents the cheesecake from sticking to the pan, allowing for easy removal and serving.
- Crush Oreos: Take your Oreos and crush them to form the delectable crust for your cheesecake. Whether using a food processor or a good old-fashioned rolling pin, aim for a fine consistency that will provide the perfect base for your creamy filling.
With these preparation steps completed, you’re one step closer to indulging in a slice of heavenly Oreo cheesecake. Get ready to delight your taste buds and impress your guests with this irresistible dessert!
Recipe Steps and Conclusion
Indulge in Irresistible Oreo Goodness
The foundation of any great cheesecake lies in its crust, and when it comes to decadence, nothing beats the rich, chocolatey goodness of an Oreo crust. Follow these simple steps to create a crust that will elevate your cheesecake to new heights of deliciousness:
- Crush Oreos Finely: Start by crushing your Oreos into fine crumbs. You can use a food processor for a quick and uniform result, or place the Oreos in a plastic bag and crush them with a rolling pin for a more hands-on approach.
- Mix with Melted Butter: Once your Oreos are finely crushed, transfer them to a bowl and mix in melted butter. The butter acts as a binding agent, helping the crust hold together and adding a touch of richness to every bite.
- Press Mixture into the Pan: Take your prepared springform pan and evenly press the Oreo mixture into the bottom. Use the back of a spoon or your fingers to compact the mixture, ensuring a firm and even crust.
- Bake for 10 Minutes: To set the crust and enhance its flavor, bake it in a preheated oven for 10 minutes. This brief stint in the oven will result in a beautifully golden crust that perfectly complements the creamy cheesecake filling.
Conclusion: A Crust Worth Savoring
With the Oreo crust prepared and baked to perfection, you’re one step closer to enjoying a slice of cheesecake heaven. The combination of rich chocolate cookies and buttery goodness sets the stage for the creamy indulgence that awaits. Get ready to wow your taste buds and impress your guests with this irresistible dessert delight!
Preparing the Red Velvet Layer
Take your cheesecake to the next level with a decadent layer of red velvet perfection. Follow these simple steps to create a stunning contrast of flavors and colors that will dazzle your taste buds:
- Mix Red Velvet Cake Ingredients: Begin by preparing the red velvet cake batter according to your favorite recipe. Combine flour, cocoa powder, sugar, eggs, buttermilk, oil, vanilla extract, and a touch of red food coloring in a mixing bowl. Beat the ingredients together until smooth and velvety, ensuring a luscious texture that will complement the creamy cheesecake filling.
- Pour Batter over the Baked Oreo Crust: Once your Oreo crust is baked to golden perfection, carefully pour the red velvet cake batter over the top. Use a spatula to spread the batter evenly, covering the entire surface of the crust. The rich red hue of the batter will create a striking contrast against the dark chocolatey base, adding visual appeal to your cheesecake masterpiece.
- Bake Until Set: Transfer the assembled cheesecake back into the oven and bake until the red velvet layer is set, approximately 20 minutes. Keep a close eye on the cheesecake as it bakes, ensuring that it achieves the perfect balance of firmness and moisture.
With the red velvet layer prepared and baked to perfection, your cheesecake is one step closer to becoming a show-stopping sensation. Get ready to impress your guests and delight your taste buds with this elegant and indulgent dessert creation!
Creating the Cheesecake Layer
Complete your cheesecake masterpiece with a sumptuous layer of creamy perfection. Follow these straightforward steps to create a cheesecake layer that will melt in your mouth and leave you craving more:
- Beat Cream Cheese and Sugar Until Smooth: In a large mixing bowl, combine cream cheese and sugar, then beat them together until smooth and creamy. This step ensures a velvety texture and uniform consistency in your cheesecake filling.
- Add Eggs One at a Time: Gradually add the eggs to the cream cheese mixture, one at a time, beating well after each addition. This gradual incorporation ensures that the eggs are fully incorporated into the batter, resulting in a silky smooth texture and preventing any lumps from forming.
- Mix in Vanilla Extract: Enhance the flavor profile of your cheesecake by mixing in vanilla extract. This aromatic addition adds depth and richness to the filling, elevating the overall taste experience.
- Pour Over the Baked Red Velvet Layer: Once your red velvet layer is baked to perfection, carefully pour the cheesecake batter over the top, covering it evenly. Use a spatula to spread the batter to the edges, ensuring a smooth and level surface.
- Bake Until Set: Transfer the assembled cheesecake back into the oven and bake for 45-50 minutes, or until the cheesecake is set. Keep an eye on the oven, ensuring that the cheesecake achieves a firm yet slightly jiggly consistency in the center.
With the cheesecake layer baked to perfection, your dessert masterpiece is now complete. Get ready to indulge in a slice of creamy decadence that will tantalize your taste buds and leave you craving more!
Cooling and Setting
After the baking process, it’s crucial to allow your cheesecake to cool and set properly to achieve the perfect texture. Follow these simple steps to ensure your cheesecake is ready to impress:
- Cool Cheesecake on a Wire Rack: Once out of the oven, transfer your cheesecake to a wire rack and let it cool for at least 1 hour. This gradual cooling process helps prevent cracking and ensures a smooth and creamy texture.
- Refrigerate for Optimal Results: After cooling, refrigerate your cheesecake for a minimum of 4 hours, or preferably overnight. This extended chilling time allows the flavors to meld together and the texture to firm up, resulting in a cheesecake that’s perfectly set and ready to be enjoyed.
By following these simple steps, you’ll ensure that your cheesecake not only looks stunning but also tastes absolutely divine. Get ready to impress your guests and indulge in a slice of creamy bliss!
Decorating and Serving
Take your cheesecake from delightful to dazzling with these simple yet effective decorating and serving techniques:
- Add Whipped Cream Topping: Elevate the visual appeal of your cheesecake by generously topping it with whipped cream. Whether piped in decorative swirls or spread in a smooth layer, whipped cream adds a touch of elegance and lightness to your dessert.
- Garnish with Crushed Oreos and Red Velvet Crumbs: Sprinkle crushed Oreos and red velvet cake crumbs over the whipped cream topping for a burst of flavor and texture. These decadent garnishes not only enhance the visual appeal of your cheesecake but also add an extra layer of indulgence to each bite.
Tips for Cutting and Serving
When it comes to cutting and serving your cheesecake, here are a few tips to ensure a flawless presentation:
- Use a Sharp Knife: Before cutting, dip a sharp knife into hot water and wipe it clean to ensure clean, smooth slices.
- Chill Before Serving: For clean cuts and well-defined layers, refrigerate your cheesecake until thoroughly chilled before slicing.
- Serve with Care: Use a flat spatula to carefully lift each slice onto a serving plate, ensuring that the layers remain intact.
With these decorating and serving tips in mind, you’re ready to present your cheesecake masterpiece with confidence and style. Get ready to impress your guests and savor every decadent bite!
FAQs
Can I use a different type of cookie for the crust?
Yes, you can substitute the Oreos with graham crackers or chocolate wafers.
How do I prevent cracks in my cheesecake?
To prevent cracks, use a water bath and allow the cheesecake to cool gradually.
Can I make this cheesecake ahead of time?
Absolutely! Store the cheesecake in the refrigerator for up to three days.
What can I substitute for red food coloring?
You can use natural alternatives like beet juice or pomegranate juice, though the color may be less vibrant.
How do I know when my cheesecake is done?
The cheesecake is done when the center is set but still slightly jiggly. It will firm up as it cools.