
Introduction
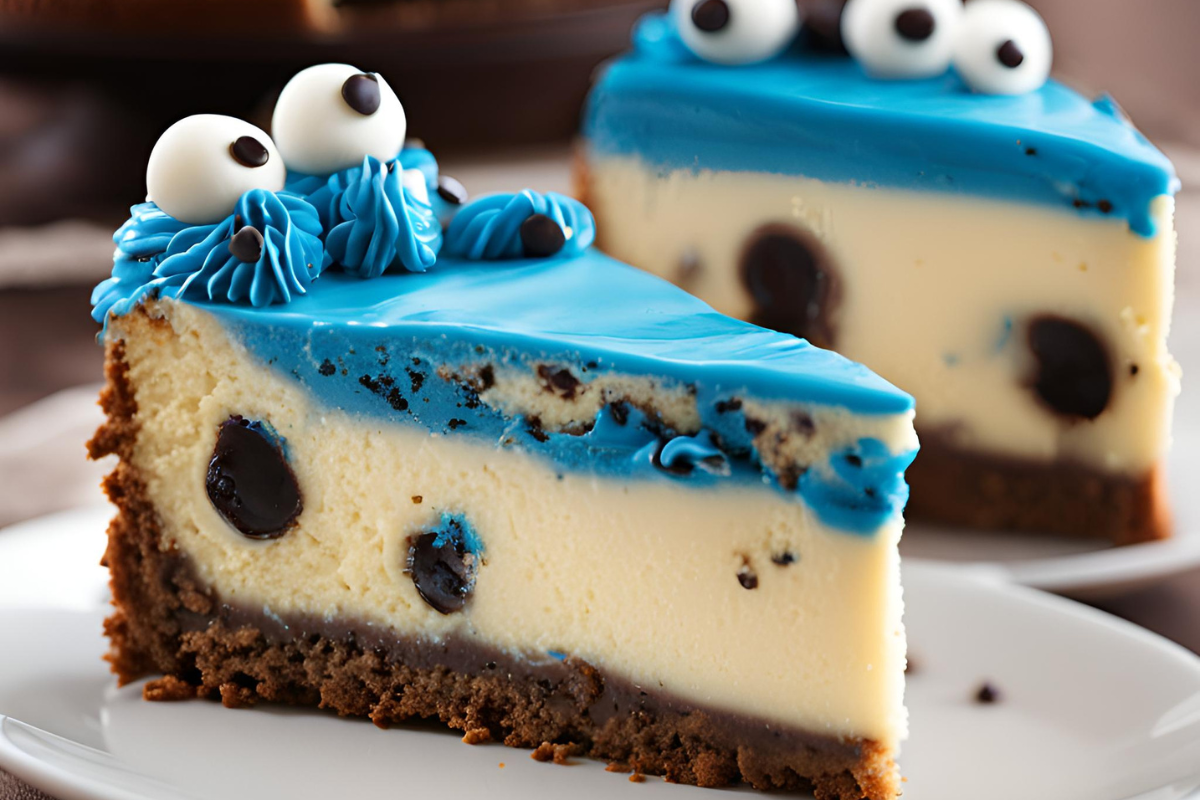
Craving a whimsical and delightful dessert? The Cookie Monster Cheesecake is a perfect blend of rich, creamy cheesecake with a fun twist of your favorite cookies. This recipe is a hit among both kids and adults, making it an excellent choice for any occasion. With its striking blue hue and delicious cookie layers, it’s a feast for both the eyes and the taste buds.
Ingredients
To make this delightful cheesecake, you’ll need the following ingredients:
Crust
- 20 Oreo cookies, crushed
- 1/4 cup melted butter
Filling
- 3 packages (8 oz each) cream cheese, softened
- 1 cup granulated sugar
- 1 tsp vanilla extract
- 3 large eggs
- 1/2 cup sour cream
- 10 crushed Chips Ahoy! cookies
Topping
- Blue food coloring
- Extra Oreos and Chips Ahoy! for decoration
- Whipped cream
Equipment Needed
- Springform pan
- Mixing bowls
- Electric mixer
- Spatula
- Measuring cups and spoons
Preparing the Crust
- Preheat your oven to 325°F (163°C).
- In a mixing bowl, combine crushed Oreos and melted butter.
- Press the mixture into the bottom of a springform pan to form an even crust.
- Bake the crust for 10 minutes, then set aside to cool.
For more inspiration on creating the perfect dessert crust, visit our home page.
Making the Cheesecake Filling
- In a large bowl, beat the cream cheese until smooth.
- Gradually add sugar and continue beating until well combined.
- Add vanilla extract and mix.
- Add eggs one at a time, beating after each addition.
- Stir in sour cream and crushed Chips Ahoy! cookies.
- Add a few drops of blue food coloring and mix until you achieve the desired color.
Assembling the Cheesecake
- Pour the filling over the cooled crust.
- Smooth the top with a spatula.
- Bake at 325°F (163°C) for about 55-60 minutes, or until the center is almost set.
Baking the Cheesecake
- Remove from the oven and run a knife around the edge to loosen the cheesecake.
- Allow it to cool completely at room temperature.
- Refrigerate for at least 4 hours, or overnight for best results.
Cooling and Setting
Proper cooling is essential to avoid cracks and ensure a smooth texture. Once the cheesecake is completely cooled, cover it and refrigerate.
Decorating the Cheesecake
- Once set, remove the cheesecake from the pan.
- Decorate with extra Oreos, Chips Ahoy! cookies, and whipped cream.
- For a dramatic effect, you can pipe whipped cream around the edges and add a few more drops of blue food coloring on top.
For more decorating tips, check out our sample page.
Serving Suggestions
- Serve the cheesecake chilled.
- Pair with a glass of cold milk or a cup of hot coffee for a delightful treat.
Equipment Needed
In the culinary world, having the right kitchen tools and equipment can make all the difference between a masterpiece meal and a kitchen disaster. Here’s a comprehensive list of must-have items to elevate your cooking game and ensure culinary success.
1. Chef’s Knife: Your Culinary Workhorse
No kitchen is complete without a high-quality chef’s knife. From chopping vegetables to slicing meats, a sharp and versatile chef’s knife is essential for every cooking task.
2. Cutting Board: A Safe and Stable Surface
Protect your countertops and maintain hygiene with a durable cutting board. Look for options made from wood or plastic that are easy to clean and won’t dull your knives.
3. Mixing Bowls: Versatile and Indispensable
Mixing bowls come in handy for blending ingredients, marinating meats, and tossing salads. Opt for a set with varying sizes to accommodate different recipes.
4. Measuring Cups and Spoons: Precision in Every Ingredient
Achieve accurate measurements for baking and cooking with a set of reliable measuring cups and spoons. Whether it’s a pinch or a cup, precision is key for perfect results.
5. Non-Stick Cookware: Effortless Cooking and Cleaning
Invest in non-stick pans and pots for hassle-free cooking and easy cleanup. From frying eggs to simmering sauces, non-stick cookware ensures food doesn’t stick and allows for healthier cooking with less oil.
6. Wooden Spoon: The Classic Kitchen Staple
A wooden spoon is a versatile tool for stirring, mixing, and even serving. Its gentle touch makes it ideal for delicate sauces and batters, while also being gentle on cookware.
7. Silicone Spatula: Scraping Every Last Bit
Don’t let any deliciousness go to waste with a silicone spatula. Perfect for scraping bowls, folding ingredients, and flipping pancakes, this kitchen essential is heat-resistant and easy to clean.
8. Oven Mitts: Safety First in the Kitchen
Protect your hands from burns and scalds with heat-resistant oven mitts. Whether you’re baking cookies or roasting a chicken, safety should always come first.
9. Grater: Freshly Grated Goodness
From cheese to citrus zest, a grater adds fresh flavors and textures to your dishes. Choose a multi-sided grater with different grating options for versatility in the kitchen.
10. Blender: Blending, Pureeing, and Beyond
Take your culinary creations to the next level with a high-powered blender. From smoothies to soups, a blender is perfect for pureeing ingredients and creating silky-smooth textures.
Conclusion
Equipping your kitchen with the right tools and equipment is essential for culinary success. From precision in measurements to ease in cooking and cleaning, each item plays a crucial role in creating delicious meals. Invest in quality tools, and watch your cooking skills soar.
Recipe Instructions
Creating the perfect crust for your culinary masterpiece is an art form in itself. Follow these step-by-step instructions and expert tips to achieve a crust that’s as delicious as it is beautiful.
Step 1: Gather Your Ingredients
To begin, gather the following ingredients for the crust:
- 1 ½ cups of all-purpose flour
- ½ teaspoon of salt
- ½ cup of unsalted butter, chilled and cubed
- 4-6 tablespoons of ice water
Step 2: Combine Flour and Salt
In a large mixing bowl, combine the all-purpose flour and salt. Use a whisk or fork to ensure even distribution of the salt throughout the flour.
Step 3: Cut in the Butter
Add the chilled and cubed unsalted butter to the flour mixture. Using a pastry cutter or two knives, cut the butter into the flour until the mixture resembles coarse crumbs. The butter should be pea-sized or smaller.
Step 4: Add Ice Water
Gradually add the ice water to the flour and butter mixture, one tablespoon at a time. Gently mix the dough with a fork until it starts to come together. Be careful not to overwork the dough.
Step 5: Form the Dough
Once the dough begins to come together, use your hands to gently press it into a ball. Flatten the ball into a disk, wrap it in plastic wrap, and refrigerate for at least 30 minutes before rolling it out.
Tips for Perfect Crust Texture:
- Keep all ingredients, especially the butter, cold to prevent it from melting into the flour.
- Use a light hand when mixing and rolling out the dough to avoid toughness.
- For a flakier crust, fold the dough over itself a few times before rolling it out.
Follow these steps and tips, and you’ll be well on your way to creating a perfect crust for your culinary creations.
Making the Cheesecake Filling
The luscious, creamy filling is the heart and soul of any cheesecake. Follow these detailed instructions and expert tips to create a cheesecake filling that’s velvety smooth and utterly irresistible.
Step 1: Gather Your Ingredients
Before you begin, gather the following ingredients for the cheesecake filling:
- 3 (8-ounce) packages of cream cheese, softened
- 1 cup of granulated sugar
- 1 teaspoon of vanilla extract
- 3 large eggs, at room temperature
- 1 cup of sour cream, at room temperature
Step 2: Prepare the Cream Cheese Mixture
In a large mixing bowl, beat the softened cream cheese until smooth and creamy. Gradually add the granulated sugar and continue beating until the mixture is light and fluffy.
Step 3: Incorporate Eggs and Vanilla
Add the room temperature eggs, one at a time, to the cream cheese mixture, beating well after each addition. Then, mix in the vanilla extract until fully incorporated. Be careful not to overmix, as this can lead to a dense cheesecake.
Step 4: Add Sour Cream
Gently fold in the room temperature sour cream until just combined. The sour cream adds richness and tanginess to the filling, balancing the sweetness of the cream cheese and sugar.
Step 5: Achieve the Right Consistency
To ensure a smooth and creamy filling, avoid overmixing once the eggs and sour cream are added. Mix until just combined to prevent incorporating too much air into the batter, which can cause cracks during baking.
Tips for Mixing and Consistency:
- Use room temperature ingredients to ensure smooth blending and avoid lumps in the filling.
- Scrape down the sides of the bowl periodically to ensure even mixing.
- For a silky-smooth texture, pass the cheesecake filling through a fine-mesh sieve before pouring it into the crust.
Follow these detailed instructions and expert tips, and you’ll be well on your way to creating a cheesecake filling that’s smooth, creamy, and utterly divine.
Assembling the Cheesecake
Assembling the cheesecake is the final step in bringing together this decadent dessert. Follow these techniques for layering the crust and filling with precision to ensure a flawless finish.
Step 1: Prepare the Crust
Retrieve the chilled crust dough from the refrigerator and roll it out on a floured surface to fit your cheesecake pan. Gently press the dough into the bottom of the pan, ensuring an even layer that covers the entire surface.
Step 2: Add the Cheesecake Filling
Pour the prepared cheesecake filling over the crust, spreading it evenly with a spatula or the back of a spoon. Ensure that the filling reaches all corners of the pan and forms a smooth, level layer.
Step 3: Smooth and Even Layers
To achieve perfectly smooth and even layers, gently tap the cheesecake pan on the counter to release any air bubbles trapped in the filling. Use a spatula to smooth out any imperfections on the surface.
Step 4: Bake to Perfection
Once assembled, bake the cheesecake according to your recipe’s instructions until the filling is set and the top is lightly golden. Allow the cheesecake to cool completely before refrigerating for several hours or overnight to set fully.
By following these techniques for assembling your cheesecake, you’ll create a dessert masterpiece that’s as visually stunning as it is delicious.
Baking the Cheesecake
Baking the cheesecake to perfection is the final step in this delectable dessert’s journey. Follow these expert tips and techniques for flawless results every time.
Step 1: Preheat the Oven
Preheat your oven to the temperature specified in your cheesecake recipe. Typically, this ranges from 325°F to 350°F (160°C to 175°C) for a gentle, even bake.
Step 2: Place in the Oven
Carefully place the assembled cheesecake in the preheated oven on the center rack. Avoid placing it too close to the oven’s heating elements to prevent uneven baking and potential cracking.
Step 3: Bake with Care
Bake the cheesecake for the time specified in your recipe, usually around 45 to 60 minutes, depending on the size and thickness of the cheesecake. Keep a close eye on it during the last few minutes of baking to prevent overcooking.
Step 4: Check for Doneness
To check if the cheesecake is done, gently jiggle the pan. The edges should be set, while the center should still have a slight wobble. Avoid overbaking, as this can lead to a dry and cracked cheesecake.
Step 5: Cool Slowly
Once baked, turn off the oven and leave the cheesecake inside with the door slightly ajar for about an hour to allow it to cool gradually. This helps prevent cracking due to sudden temperature changes.
By following these baking instructions and expert tips, you’ll master the art of baking cheesecake with confidence and finesse, ensuring a flawless dessert every time.
FAQs
How to Store Leftover Cheesecake?
Store leftover cheesecake in an airtight container in the refrigerator for up to 5 days.
Can I Freeze Cookie Monster Cheesecake?
Yes, you can freeze the cheesecake. Wrap it tightly in plastic wrap and aluminum foil before freezing. It can be stored for up to 2 months.
What Can I Substitute for Certain Ingredients?
You can use gluten-free cookies for the crust and filling if you need a gluten-free option.
How to Avoid Cracks in the Cheesecake?
Ensure all ingredients are at room temperature before mixing. Avoid overbaking and let the cheesecake cool gradually.
Expert Tips and Tricks
- Use a water bath to bake the cheesecake for an even texture.
- Avoid opening the oven door frequently during baking to maintain a consistent temperature.
Conclusion
The Cookie Monster Cheesecake is a delightful and fun dessert that’s sure to impress. With its rich flavors and eye-catching presentation, it’s perfect for any celebration. So go ahead, give this recipe a try and enjoy a piece of dessert heaven!