
Introduction
Homemade Reese’s Peanut Butter Cups are a beloved treat that combines the perfect blend of chocolate and peanut butter. Making these cups at home not only allows for creativity in the kitchen but also provides control over the ingredients, leading to a healthier and more personalized snack. This article will guide you through the process of making your own homemade Reese’s Peanut Butter Cups, highlighting essential tips and variations along the way.
By following this guide, you’ll discover how easy it is to create homemade Reese’s Peanut Butter Cups that taste just like the original. Whether you prefer a classic flavor or want to experiment with new variations, making these treats at home is a rewarding experience.
Ingredients Overview
Creating your own Reese’s Peanut Butter Cups requires a few key ingredients:
- Peanut butter (creamy or crunchy)
- Powdered sugar
- Chocolate (milk, dark, or white)
- Unsalted butter
- Graham crackers (optional for texture)
Using high-quality ingredients will enhance the flavor and texture of your homemade Reese’s Peanut Butter Cups. If you’re aiming for a healthier option, consider using dark chocolate, which offers numerous health benefits. Learn more about the benefits of dark chocolate.
Equipment Needed
To make homemade Reese’s Peanut Butter Cups, you will need the following equipment:
- Mixing bowls
- Microwave or double boiler for melting chocolate
- Muffin tin or silicone molds
- Cupcake liners (optional)
- Spoon or piping bag for filling
Step-by-Step Recipe Instructions
Step 1: Preparing the Filling
Begin by melting the unsalted butter. In a mixing bowl, combine the melted butter with the peanut butter and powdered sugar. Mix until the consistency is smooth and slightly firm. Adjust the sweetness by adding more powdered sugar if needed.
Step 2: Melting the Chocolate
Melt the chocolate using either a microwave or a double boiler. the microwave method, heat the chocolate in short intervals, stirring in between to prevent burning. a stovetop method, use a double boiler to gently melt the chocolate, ensuring it doesn’t overheat. detailed instructions, refer to how to melt chocolate properly.
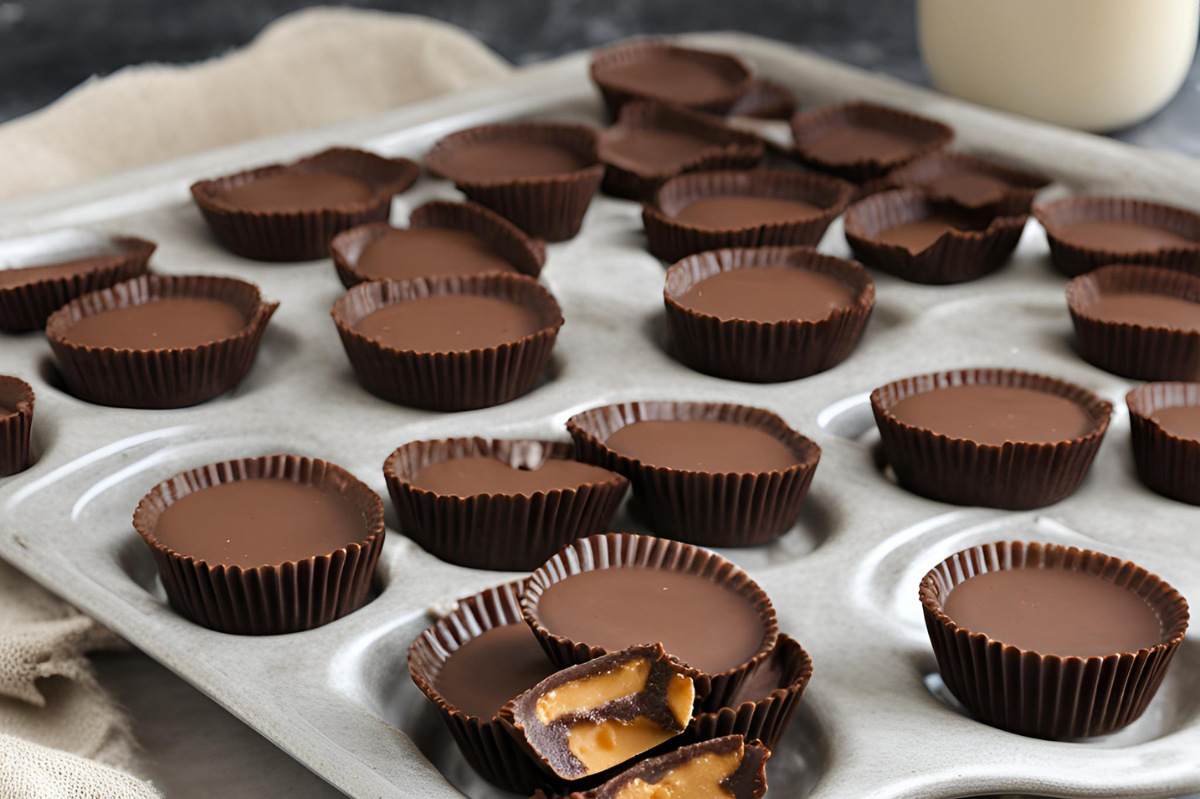
Step 3: Assembling the Cups
- Line your muffin tin or molds with cupcake liners.
- Spoon a layer of melted chocolate into the bottom of each mold.
- Add a dollop of the peanut butter mixture on top of the chocolate layer.
- Cover the peanut butter filling with another layer of melted chocolate, ensuring it’s evenly spread.
Step 4: Cooling and Setting
Place the filled molds in the refrigerator for about 30 minutes to an hour, or until the chocolate is fully set. This ensures that the layers bond well and the cups hold their shape when removed.
Step 5: Final Touches
Once the peanut butter cups are set, remove them from the molds or liners. You can decorate the tops with a drizzle of melted chocolate or a sprinkle of sea salt for added flavor. Store the homemade treats in an airtight container at room temperature or in the refrigerator for a longer shelf life.
Variations and Customizations
Dark Chocolate Peanut Butter Cups
For a richer flavor, use dark chocolate instead of milk chocolate. Dark chocolate pairs well with the sweetness of the peanut butter filling and offers added health benefits.
Vegan and Gluten-Free Options
To make a vegan version, use vegan chocolate and substitute the butter with a plant-based alternative. Ensure all ingredients are certified gluten-free if you’re catering to dietary restrictions.
Holiday-Themed Peanut Butter Cups
Get creative by making holiday-themed peanut butter cups. Use molds shaped like hearts for Valentine’s Day or pumpkins for Halloween. You can also add festive flavors like peppermint for Christmas.
Tips and Tricks
- Avoid common mistakes: Ensure the chocolate isn’t overheated to prevent it from becoming grainy.
- Enhancing flavor and texture: Add a pinch of salt to the peanut butter mixture for a balanced flavor.
- Making large batches: Double the recipe and use larger molds to make more cups at once.
Conclusion
Making homemade Reese’s Peanut Butter Cups is a fun and rewarding process that allows for endless customization. By following these steps and tips, you can create delicious treats that cater to your taste and dietary preferences. Enjoy the process and experiment with different variations to find your perfect combination.
Ingredients Overview
In the realm of culinary artistry, the quality of ingredients reigns supreme. Whether crafting a simple home-cooked meal or orchestrating a gourmet masterpiece, understanding the essence of essential ingredients is paramount.
Ingredients Overview: Elevating Your Creations
To embark on a journey of culinary brilliance, one must first acquaint themselves with the foundational elements of flavor. Here’s a concise overview:
List of Essential Ingredients: Building Blocks of Taste
- Fresh Herbs and Spices: From the vibrant punch of basil to the warming embrace of cinnamon, herbs and spices add depth and complexity to dishes.
- Premium Oils and Vinegars: The golden hues of olive oil and the tangy notes of balsamic vinegar elevate both salads and cooked dishes alike.
- Quality Proteins: Whether it’s succulent cuts of meat, delicate seafood, or plant-based alternatives, proteins form the heart of many culinary creations.
- Farm-Fresh Produce: Crisp vegetables and luscious fruits offer a burst of freshness and vitality, enhancing both visual appeal and nutritional value.
Substitutions and Variations: Navigating Culinary Creativity
While adhering to recipes is a hallmark of culinary tradition, innovation thrives through experimentation. Here’s how to navigate substitutions and variations:
- Adapting to Dietary Restrictions: Explore alternative ingredients to accommodate dietary preferences and restrictions without compromising on taste or texture.
- Embracing Seasonal Variations: Harness the bounty of each season by incorporating seasonal produce and ingredients, infusing dishes with natural vibrancy and flavor.
Importance of Quality Ingredients: Elevating Every Bite
Beyond mere sustenance, quality ingredients transform meals into memorable experiences. Here’s why prioritizing quality is non-negotiable:
- Enhanced Flavor Profiles: Premium ingredients boast superior flavor profiles, imparting depth, richness, and nuance to every dish.
- Nutritional Superiority: Opting for quality ingredients ensures a higher nutritional content, promoting overall health and well-being.
- Culinary Satisfaction: From the tantalizing aroma that fills the kitchen to the exquisite taste that dances on the palate, quality ingredients elevate culinary satisfaction to new heights.
Conclusion: Crafting Culinary Masterpieces
In the tapestry of culinary creation, every ingredient plays a vital role in weaving together a masterpiece of flavor and delight. By embracing the importance of quality ingredients and exploring the myriad possibilities they offer, aspiring chefs and seasoned cooks alike can unlock the true potential of their culinary endeavors.
Step-by-Step Recipe Instructions
To kickstart your journey to peanut butter perfection, follow these simple steps to prepare the delectable filling:
-
Gather Your Ingredients:
Begin by assembling the necessary components for the filling. You’ll need smooth peanut butter, powdered sugar, and any additional flavorings or ingredients of your choice.
-
Melting and Mixing:
In a microwave-safe bowl, combine the creamy peanut butter and powdered sugar. Microwave the mixture in short intervals, stirring in between, until the peanut butter is slightly softened and the powdered sugar is fully incorporated. This process ensures a smooth and creamy consistency for your filling.
-
Incorporate Additional Ingredients:
For a personalized touch, feel free to experiment with additional flavorings such as vanilla extract, cocoa powder, or a pinch of salt. These enhancements can elevate the flavor profile of your filling and add a delightful twist to your peanut butter delights.
-
Achieving the Right Consistency:
As you mix the ingredients together, pay close attention to the texture and consistency of the filling. Aim for a smooth and pliable mixture that holds its shape when molded. If the filling is too stiff, you can add a small amount of melted butter or coconut oil to soften it. Conversely, if the filling is too runny, gradually incorporate more powdered sugar until the desired consistency is achieved.
-
Tips for Success:
To ensure optimal results, consider the following tips:
-
- Use room temperature peanut butter for easier mixing and smoother consistency.
- Sift the powdered sugar before adding it to the peanut butter to prevent lumps in the filling.
- Experiment with different types of peanut butter, such as crunchy or flavored varieties, to customize the flavor and texture of your filling.
- Taste the filling as you go and adjust the sweetness or flavorings according to your preference.
By following these simple steps and tips, you’ll master the art of preparing the perfect peanut butter filling for your delightful creations. Stay tuned for the next steps in crafting your irresistible peanut butter treats!
Melting the Chocolate
When it comes to melting chocolate, you have two primary methods at your disposal: the microwave or the stovetop. Here’s a brief comparison:
- Microwave Method: Place the chocolate in a microwave-safe bowl and heat it in short bursts, stirring frequently until melted. This method is quick and convenient but requires careful monitoring to prevent overheating.
- Stovetop Method: Alternatively, you can melt chocolate on the stovetop using a double boiler or a heatproof bowl set over a pot of simmering water. This method provides more control over the melting process and reduces the risk of burning or seizing.
Best Practices: To avoid burning or seizing the chocolate, follow these best practices:
- Chop the chocolate into small, uniform pieces for even melting.
- Avoid overheating the chocolate, as high temperatures can cause it to scorch or seize.
- Stir the chocolate regularly to ensure smooth and consistent melting.
- Remove the chocolate from the heat as soon as it’s melted, as residual heat can continue to cook the chocolate.
By selecting the method that best suits your needs and following these best practices, you’ll achieve perfectly melted chocolate every time.
Assembling the Cups
Now that you’ve prepared your luscious peanut butter filling and melted chocolate, it’s time to bring them together in harmonious bliss. Follow these steps to assemble your irresistible peanut butter cups:
- Prepare Your Molds: Line a muffin tin with paper or silicone cupcake liners for easy removal. Alternatively, you can use candy molds or mini muffin trays for smaller portions.
- Layering Chocolate and Filling: Begin by spooning a small amount of melted chocolate into the bottom of each mold, ensuring an even layer. Next, add a dollop of peanut butter filling on top of the chocolate layer, gently pressing it down to create a smooth surface. Finally, cover the filling with another layer of melted chocolate, ensuring that it completely encases the peanut butter filling.
- Techniques for Even Distribution: To achieve uniformity in your peanut butter cups, use a spoon or offset spatula to spread the chocolate evenly over the filling, smoothing out any bumps or uneven areas. Take care to seal the edges of the cups to prevent any leakage or seepage of the filling.
- Chill and Set: Once assembled, place the peanut butter cups in the refrigerator for at least 30 minutes, or until the chocolate has set completely. This chilling process allows the layers to firm up and ensures easy removal from the molds.
By following these simple steps and techniques, you’ll create perfectly assembled peanut butter cups with a delightful balance of chocolatey goodness and creamy filling. Get ready to indulge in a decadent treat that’s sure to satisfy your sweet cravings!
FAQs
Reese’s peanut butter cups are renowned for their irresistible combination of smooth peanut butter filling encased in rich milk chocolate. The filling in a Reese’s peanut butter cup consists of a creamy blend of roasted peanuts, sugar, salt, and other ingredients to achieve its signature taste and texture.
To craft Reese’s peanut butter cups, the process begins with the creation of the peanut butter filling. Roasted peanuts are ground into a smooth paste and combined with sugar, salt, and other ingredients to enhance flavor and texture. The peanut butter mixture is then carefully portioned and molded into the desired shape to fit inside the chocolate cups.
Next, the chocolate coating is prepared by melting high-quality milk chocolate until smooth and velvety. The chocolate is poured into cup-shaped molds, forming a base layer. Once set, the peanut butter filling is placed on top of the chocolate layer, and additional melted chocolate is poured over the filling to seal the cups.
As for why Reese’s peanut butter cups taste different, it’s primarily due to the specific ingredients and ratios used in their formulation. Reese’s has perfected their recipe over the years to achieve a unique balance of sweet, salty, and nutty flavors that set their peanut butter cups apart from other brands.
While Reese’s peanut butter is similar to traditional peanut butter in terms of ingredients such as roasted peanuts, sugar, and salt, it may differ slightly in texture and flavor due to variations in processing and recipe formulation. Reese’s peanut butter is specially formulated to complement the chocolate coating in their peanut butter cups, resulting in a distinctively delicious taste experience.
Conclusion
Making homemade Reese’s Peanut Butter Cups is a fun and rewarding process that allows for endless customization. By following these steps and tips, you can create delicious treats that cater to your taste and dietary preferences. Enjoy the process and experiment with different variations to find your perfect combination.