
Introduction to Strawberry Cake Roll
Strawberry Cake Roll is a stunning dessert that combines the delicate flavors of strawberries with the soft, airy texture of sponge cake. This dessert is not only a feast for the palate but also a visual treat, making it a popular choice for celebrations and seasonal gatherings.
For more delicious recipes, explore our complete collection on the recipes page.
Ingredients and Tools Needed
To begin your strawberry cake roll adventure, you’ll need the following ingredients and tools:
- Ingredients:
- Fresh strawberries
- Eggs
- Granulated sugar
- Cake flour
- Heavy cream
- Tools:
- Jelly roll pan
- Mixer
- Parchment paper
- Spatula
Learn more about the importance of selecting the right kitchen tools on our home page.
Preparing the Sponge Cake
Creating the perfect sponge for your cake roll is crucial. Here’s how to ensure it turns out light and fluffy:
- Whisk the eggs and sugar until they’re pale and voluminous.
- Sift the cake flour into the egg mixture and fold gently to keep the air in.
- Spread the batter evenly in a lined jelly roll pan and bake until just set.
Design and Aesthetics
Aesthetic appeal is key in making your strawberry cake roll a centerpiece at any gathering. Consider the following for an impressive presentation:
- Use a thin batter to pipe designs like strawberries or abstract patterns onto the parchment before pouring the main batter.
- Experiment with natural food colorings to enhance the visual appeal of your designs.
The Filling
The strawberry filling is what truly sets this cake roll apart. Here’s how to make a strawberry whipped cream that’s both tasty and stable:
- Puree fresh strawberries and strain them to get a smooth juice.
- Combine the juice with heavy cream and a stabilizer like gelatin to help maintain the shape of the roll.
Rolling and Presentation
Rolling the cake without it breaking is a skill that improves with practice:
- Once the cake is baked, immediately roll it with the parchment while it’s still hot to set its shape.
- After cooling, unroll gently, spread the filling evenly, and re-roll.
Ingredients and Tools Needed
here’s a detailed list of common ingredients and essential kitchen tools:
Ingredients:
- Vegetables:
- Onions
- Garlic
- Bell peppers (red, green, yellow)
- Tomatoes
- Potatoes
- Carrots
- Leafy greens (spinach, kale, lettuce)
- Mushrooms
- Proteins:
- Chicken breasts/thighs
- Beef (steak, ground beef)
- Fish fillets (salmon, tilapia)
- Tofu/tempeh (for vegetarian/vegan options)
- Eggs
- Grains and Carbs:
- Rice (white, brown, basmati)
- Pasta (spaghetti, penne, fusilli)
- Bread (for sandwiches or toast)
- Quinoa
- Lentils/beans
- Dairy and Alternatives:
- Milk (dairy or plant-based like almond, soy)
- Cheese (cheddar, mozzarella, feta)
- Yogurt (plain or flavored)
- Butter/margarine
- Herbs and Spices:
- Salt
- Black pepper
- Olive oil
- Garlic powder
- Paprika
- Cumin
- Basil
- Oregano
- Thyme
- Rosemary
- Chili powder
- Condiments and Sauces:
- Soy sauce
- Tomato sauce
- Ketchup
- Mustard
- Mayonnaise
- Sriracha/hot sauce
- Vinegar (balsamic, apple cider, white)
- Honey/maple syrup
Essential Kitchen Tools and Their Uses:
- Chef’s Knife: For chopping vegetables, fruits, and meats.
- Cutting Board: To provide a stable surface for cutting and chopping.
- Saucepan: For cooking sauces, soups, and boiling water.
- Skillet/Frying Pan: For frying, sautéing, and searing meats and vegetables.
- Baking Sheet: For baking cookies, roasting vegetables, or making sheet pan dinners.
- Mixing Bowls: For mixing ingredients, marinating, and serving salads.
- Measuring Cups and Spoons: For accurately measuring ingredients like flour, sugar, and spices.
- Wooden Spoon: For stirring sauces, soups, and sautéing ingredients.
- Whisk: For blending ingredients smoothly, such as eggs or sauces.
- Tongs: For flipping meats and vegetables while cooking.
- Colander/Strainer: For draining pasta, washing vegetables, and rinsing beans.
- Can Opener: For opening canned goods like beans, tomatoes, and sauces.
- Oven Mitts: For safely handling hot pots, pans, and baking dishes.
- Food Processor/Blender: For pureeing sauces, making smoothies, and chopping vegetables.
- Grater: For grating cheese, vegetables, and spices like nutmeg.
- Kitchen Timer: For keeping track of cooking times and preventing burning.
- Meat Thermometer: For checking the internal temperature of meats to ensure they’re cooked properly.
- Rolling Pin: For rolling out dough for pies, pizzas, and cookies.
- Pastry Brush: For brushing on glazes or butter onto pastries and baked goods.
- Peeler: For peeling vegetables and fruits like potatoes and apples.
These are some of the basic ingredients and tools you’ll need to get started in the kitchen. Of course, there are many more specialized tools and ingredients you can explore as you become more comfortable with cooking!
Preparing the Sponge Cake
Here’s a step-by-step guide for preparing a sponge cake along with some tips for achieving a light and airy texture:
Ingredients:
- 4 large eggs, at room temperature
- 1 cup granulated sugar
- 1 teaspoon vanilla extract
- 1 cup all-purpose flour
- 1 teaspoon baking powder
- 1/4 teaspoon salt
Step-by-Step Instructions:
- Preheat the Oven:
- Preheat your oven to 350°F (175°C). Grease and flour a 9-inch round cake pan or line it with parchment paper.
- Prepare the Eggs:
- In a large mixing bowl, crack the eggs and add the granulated sugar.
- Beat the Eggs and Sugar:
- Using an electric mixer, beat the eggs and sugar together on high speed for about 5-7 minutes or until the mixture is thick, pale, and doubled in volume. This step is crucial for incorporating air into the batter, which will give the sponge cake its light and airy texture.
- Add Vanilla Extract:
- Once the egg mixture is light and fluffy, add the vanilla extract and mix until combined.
- Sift the Dry Ingredients:
- In a separate bowl, sift together the all-purpose flour, baking powder, and salt. Sifting helps to aerate the flour and remove any lumps, resulting in a smoother batter.
- Fold in the Dry Ingredients:
- Gently fold the sifted dry ingredients into the egg mixture using a spatula. Be careful not to deflate the batter; you want to maintain as much of the air that you’ve beaten into it as possible.
- Pour the Batter into the Pan:
- Pour the batter into the prepared cake pan and spread it evenly with a spatula.
- Bake the Cake:
- Bake the sponge cake in the preheated oven for 25-30 minutes, or until the top is golden brown and springs back when lightly touched. Avoid opening the oven door frequently during baking, as this can cause the cake to collapse.
- Cool the Cake:
- Once the cake is done, remove it from the oven and let it cool in the pan for about 10 minutes. Then, transfer it to a wire rack to cool completely.
- Serve or Decorate:
- Once the sponge cake has cooled completely, you can serve it as is or decorate it with whipped cream, fresh fruit, or your favorite frosting.
Tips for Achieving a Light and Airy Texture:
- Room Temperature Ingredients: Make sure your eggs are at room temperature before beating them. Warmer eggs whip up better and create more volume.
- Proper Mixing: Beat the eggs and sugar together until the mixture is thick, pale, and doubled in volume. This process incorporates air into the batter, resulting in a lighter texture.
- Gentle Folding: When adding the dry ingredients to the egg mixture, fold them in gently using a spatula. Overmixing can deflate the batter and result in a denser cake.
- Avoid Overbaking: Be careful not to overbake the sponge cake, as this can dry it out and make it dense. Bake just until the top is golden brown and springs back when lightly touched.
- Cooling Properly: Allow the cake to cool completely before serving or decorating. Cooling too quickly can cause the cake to collapse and lose its airy texture.
By following these steps and tips, you’ll be able to prepare a delicious sponge cake with a light and airy texture that’s sure to impress!
Design and Aesthetics
Creating visually appealing designs on a cake roll, such as patterned cake rolls, can elevate its presentation and make it even more enticing. Here are some techniques for adding designs to a cake roll and the importance of visual presentation:
Techniques for Adding Designs to Cake Rolls:
- Swirls and Spirals:
- After spreading the cake batter onto the prepared baking sheet, use a toothpick or skewer to create swirls or spirals in the batter. Drag the toothpick through the batter in a zigzag or spiral motion to create decorative patterns.
- Marbling:
- Divide the cake batter into smaller portions and add food coloring to each portion to create different colors. Pour the colored batters onto the prepared baking sheet in alternating lines or dots. Use a toothpick or skewer to gently swirl the colors together to create a marbled effect.
- Checkerboard Pattern:
- Pour two different colored batters onto the prepared baking sheet in alternating rows or columns. Use a knife or spatula to create a checkerboard pattern by dragging it through the batters in one direction and then in the opposite direction.
- Lettering or Shapes:
- Pipe or spread contrasting colored batter onto the prepared baking sheet to form letters, numbers, or shapes. This technique requires a steady hand and precision to achieve clean lines and shapes.
- Chocolate Decorations:
- Melt chocolate and pour it into a piping bag or plastic squeeze bottle. Pipe intricate designs or patterns onto a parchment paper-lined baking sheet and let them set until firm. Once hardened, carefully peel the chocolate decorations off the parchment paper and place them onto the rolled cake.
Importance of Visual Presentation:
- Enhances Appetite Appeal:
- A visually appealing cake roll stimulates the appetite and entices people to indulge in the treat. Vibrant colors, intricate designs, and beautiful decorations make the cake more inviting and irresistible.
- Impresses Guests:
- Serving a well-decorated cake roll showcases your creativity and attention to detail, leaving a lasting impression on your guests. It demonstrates your commitment to providing not only delicious but also visually stunning desserts.
- Celebrates Special Occasions:
- Decorating a cake roll with themed designs or patterns adds a festive touch to special occasions and celebrations. Whether it’s a birthday, holiday, or anniversary, a beautifully decorated cake roll becomes the centerpiece of the dessert table and adds to the joyous atmosphere.
- Professional Presentation:
- Visual presentation is key in professional settings such as bakeries, cafes, and restaurants. A meticulously decorated cake roll reflects the craftsmanship and skill of the baker, attracting customers and enhancing the reputation of the establishment.
- Creates Memorable Experiences:
- A visually stunning cake roll not only satisfies the taste buds but also creates memorable experiences for those who enjoy it. The combination of delicious flavors and eye-catching designs makes the dessert memorable and worthy of sharing with loved ones.
By utilizing these techniques and understanding the importance of visual presentation, you can create stunning and memorable cake rolls that delight both the eyes and the palate.
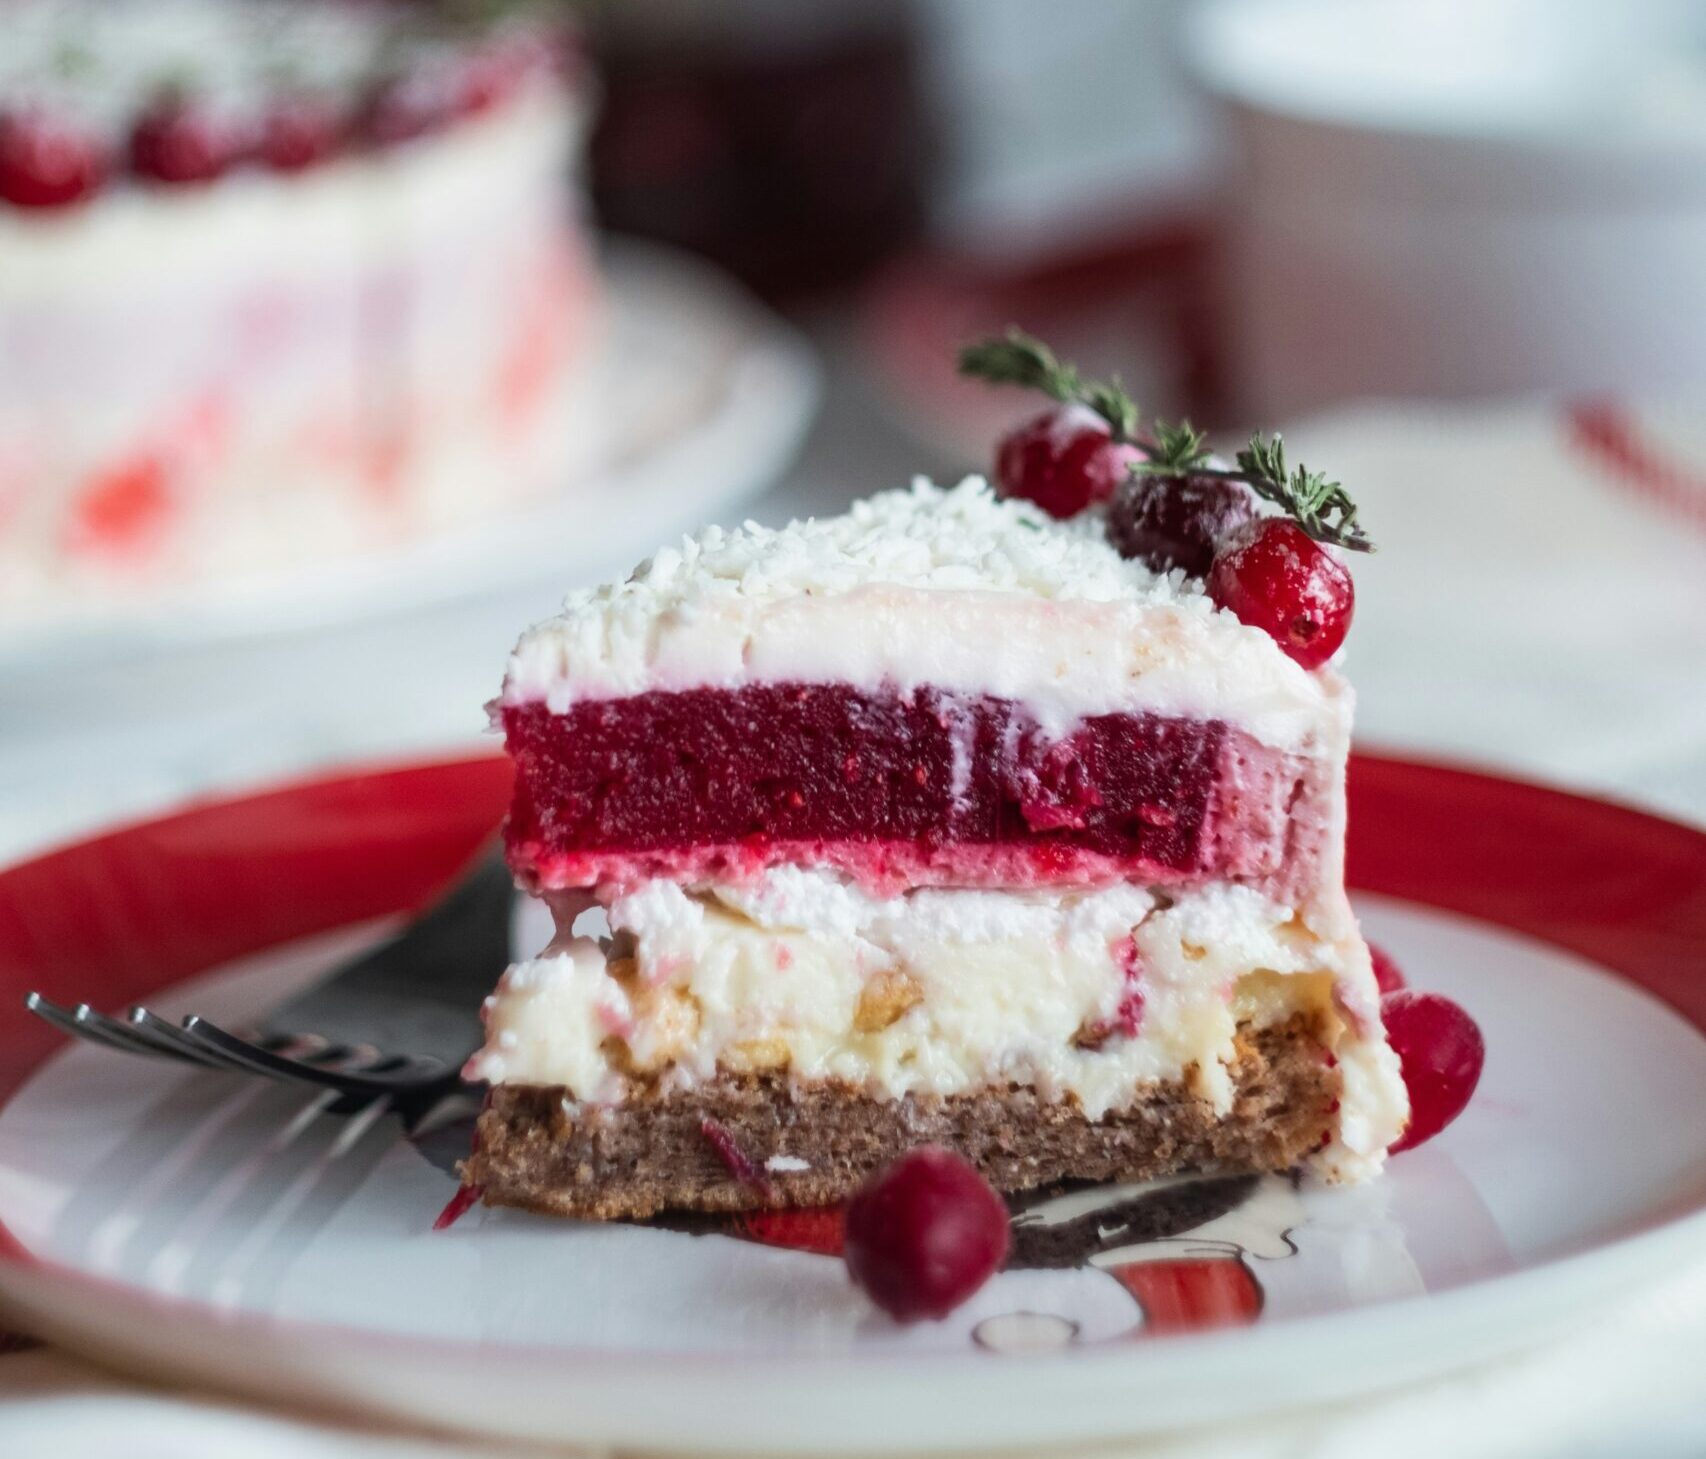
The Filling
Here are different types of strawberry fillings and instructions for preparing strawberry whipped cream:
Different Types of Strawberry Fillings:
- Fresh Strawberry Filling:
- Ingredients:
- Fresh strawberries, hulled and sliced
- Sugar (optional)
- Instructions:
- Place the sliced strawberries in a bowl.
- Optionally, sprinkle sugar over the strawberries to sweeten them, depending on your preference and the natural sweetness of the strawberries.
- Gently toss the strawberries until they are coated in sugar (if using). Let them sit for about 15-20 minutes to release their juices before using as a filling for your cake roll.
- Ingredients:
- Strawberry Jam Filling:
- Ingredients:
- Strawberry jam or preserves
- Instructions:
- Spread a layer of strawberry jam evenly over the cooled cake before rolling it up. Use as much or as little jam as you prefer, depending on your taste.
- Ingredients:
- Strawberry Cream Cheese Filling:
- Ingredients:
- Cream cheese, softened
- Powdered sugar
- Fresh strawberries, diced
- Instructions:
- In a mixing bowl, beat softened cream cheese until smooth.
- Gradually add powdered sugar to the cream cheese, mixing until well combined and smooth.
- Gently fold diced fresh strawberries into the cream cheese mixture.
- Spread the strawberry cream cheese filling evenly over the cooled cake before rolling it up.
- Ingredients:
Instructions for Preparing Strawberry Whipped Cream:
- Ingredients:
- Heavy whipping cream
- Powdered sugar
- Fresh strawberries, diced or pureed
- Instructions:
- Chill a mixing bowl and beaters in the refrigerator for at least 15-20 minutes before making the whipped cream. Cold utensils help the cream whip faster and to a better consistency.
- In the chilled mixing bowl, pour in the heavy whipping cream.
- Start beating the cream on medium speed until it begins to thicken.
- Gradually add powdered sugar to sweeten the whipped cream, according to your taste preference. Continue beating until soft peaks form.
- Add diced or pureed fresh strawberries to the whipped cream, folding them in gently until evenly distributed. The amount of strawberries you add can vary depending on your preference for strawberry flavor and color.
- Continue beating the whipped cream until it reaches stiff peaks and holds its shape.
- Use the strawberry whipped cream to fill and frost your cake roll, spreading it evenly over the cake before rolling it up.
By using these strawberry fillings and preparing strawberry whipped cream, you can create a deliciously fruity and flavorful cake roll that’s perfect for any occasion!
FAQS
Making a cake roll without cracking it can be achieved by following a few key steps:
- Use the Right Pan: Use a jelly roll pan or a rimmed baking sheet with shallow sides. Line the pan with parchment paper and lightly grease it with cooking spray or butter to prevent sticking.
- Properly Beat the Eggs: Beat the eggs and sugar until thick, pale, and doubled in volume. This will create a stable structure for the cake and help prevent cracking.
- Gentle Folding: When folding in the dry ingredients, do so gently to avoid deflating the batter. Use a spatula and make sure to fully incorporate the dry ingredients without overmixing.
- Even Thickness: Spread the batter evenly in the prepared pan using an offset spatula. Make sure the batter is evenly distributed to ensure uniform thickness throughout the cake.
- Avoid Overbaking: Bake the cake just until it springs back when lightly touched and is golden brown. Overbaking can dry out the cake and make it more prone to cracking.
- Use a Kitchen Towel: Immediately after removing the cake from the oven, loosen the edges with a knife and carefully invert it onto a clean kitchen towel dusted with powdered sugar. Roll the cake up tightly while it’s still warm. Rolling it while warm helps to train the cake and prevent cracking when filling and rolling it later.
- Cool Completely: Allow the rolled cake to cool completely before unrolling it and adding the filling. This helps the cake maintain its shape and prevents it from cracking.
Difference Between Japanese Roll Cake and Swiss Roll Cake:
- Japanese Roll Cake:
- Japanese roll cake, also known as “Mochi Roll Cake” or “Soufflé Roll Cake,” typically has a softer, more delicate texture compared to Swiss roll cake.
- Japanese roll cake often uses a combination of cake flour and cornstarch or potato starch to achieve its soft and fluffy texture.
- It’s often filled with light and airy fillings such as whipped cream, custard, or fruit.
- Japanese roll cakes may have a more subtle sweetness compared to Swiss roll cakes.
- Swiss Roll Cake:
- Swiss roll cake, also known simply as “roll cake” or “jelly roll,” has a slightly denser texture compared to Japanese roll cake.
- Swiss roll cake typically uses a sponge cake base made with eggs, sugar, flour, and sometimes baking powder.
- It’s filled with various fillings such as jam, whipped cream, buttercream, or chocolate ganache.
- Swiss roll cakes are often rolled with the seam side down to prevent cracking and maintain a smooth appearance.
Using Fresh Strawberries in the Middle of the Cake:
Yes, you can absolutely put fresh strawberries in the middle of the cake. Just make sure to slice them thinly and arrange them evenly over the filling to ensure that the cake rolls up smoothly without cracking.
Putting Strawberries on a Cake:
Yes, you can put strawberries on a cake as a decorative element or garnish. Fresh strawberries can be sliced and arranged on top of the cake, used to decorate the sides, or placed around the base of the cake for a beautiful presentation. Strawberry halves or whole strawberries with stems can also be used for a more elegant look.